Tuesday, July 10, 2012

Malai Kofta Step by Step Recipe


Malai Kofta
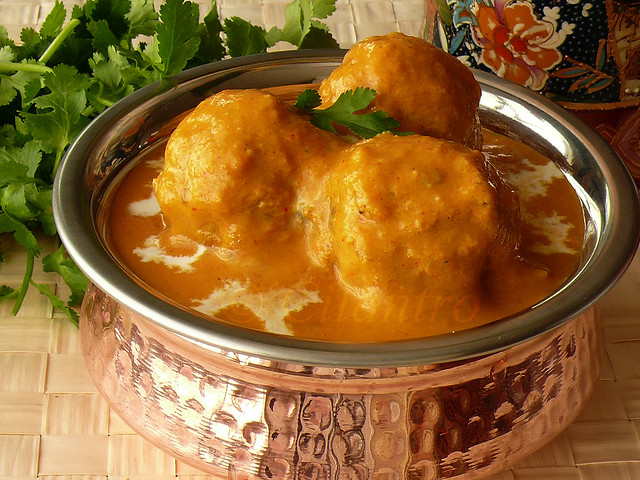
Most often delicious food involves elaborate procedures and lots of calories. It is not always true but most often times it is. Malai refers to cream and koftas used to dunk in the cream is made of paneer and potatoes. This particular Moghalai dish is loaded with Paneer, cashews, cream and other ingredients that will definitely make people think twice before indulging in the pure magic of this highly addictive, wonderful tasting dish.
It is definitely a time consuming process and I strongly believe that finding a shortcut or trying to reduce the calorie/fat content will ruin the extraordinary taste that the dish possesses. Indulging once in a while is worth the try. I made them for my daughters birthday and all my guests loved them. The menu for her birthday was~Nan,Tomato rice, Curd rice, Malai kofta, Achari Chicken, Raita  and Malai Jamun 
Ingredients:
For koftas:
  1. Paneer 14 oz (approx 400 g)
  2. 5 potatoes, medium-sized
  3. 2 big carrots, grated
  4. ½ cup, cashews
  5. ¼ cup, golden raisins
  6. 1 teaspoon, salt
  7. 5 to 6 Green chillies
  8. v cup Corn flour/ corn starch
  9. Finely cut cilantro
  10. Salt to taste
For the Malai gravy:
  1. 2 cup Onions, roughly chopped
  2. 2 cup chopped tomatoes
  3. 2teaspoon cumin
  4. 1 teaspoon pepper
  5. 2 teaspoon ginger garlic paste
  6. 2 teaspoon chilli powder
  7. 2 teaspoon kashmiri chilli powder
  8. 1 teaspoon turmeric powder
  9. 2 teaspoon coriander powder
  10. 1 teaspoon garam masala powder(MTR)
  11. 1 cup small paneer cubes
  12. ½ cup cashew
  13. ½ cup raisins.
  14. cups whole milk
  15. 1 teaspoon Kasuri Methi
  16. Oil
  17. Salt 
Procedure:
1. Cook the potatoes, when cool peel the skin and mash and set aside.
2. In a food processor grate the paneer, carrots and on low speed grind the rest of the ingredients, ( I am glad I used the processor and not the mixer. The mixer tends to grind to a smooth paste). I recommend the processor but it is not compulsory. When using the mixer, grate the paneer and carrots separately in a grater.

3. Transfer the contents to a mixing bowl. Mix the potatoes and combine well. Set this aside.


4. Heat up oil in a pan/kadai and add the onions and sauté until soft. Now add the cumin and pepper and mix well for few minutes. Now add ginger garlic paste and sauté well for few more minutes. 
To this add all the powders and combine well and immediately add the tomatoes. Sauté
until it becomes a thick gravy.
 
5. Remove from heat and mix the cashews and paneer to it. Allow this to cool. When cool grind to a paste in a food processor along with raisins. I would again recommend the food processor since it tends to grind it to a nice creamy & coarse paste.


6. Add a cup of whole milk and 1/4 cup whipping cream and bring to a boil stirring consistently ensuring not to burn the gravy. The creamy gravy tends to burn at the bottom. Simmer for about five minutes again stirring consistently. Finally add kasuri methi.
7. Make small balls from the previously prepared kofta dough and dust them with some corn flour as show. 
8. Now heat oil in a kadai/pan for deep frying. When hot simmer on medium heat and deep fry the prepared koftas to a nice brown color as shown.
9. Arrange the koftas in a wide baking tray as shown.
10. Pour the prepared gravy to the koftas and let it soak for about 10 to 15 minutes before serving. This is to soak the koftas a little. Make sure the gravy is warm when adding the koftas.

Friday, June 29, 2012

Hyderabadi Chicken Dum Biryani


This is the first dish I tasted on my visit to hyderabad after my wedding. I have fallen in love with this authentic and elegant delicacy since then. It is worth spending time to make this at home and watch your loving ones relish the dish. Hyderabadi dum biryani is a signature dish from hyderabad, the city of pearls and is said to be a blend of mughal and persian cuisine. Basmati rice cooked with layers of marinated chicken or meat in a wide, heavy bottomed vessel on a low flame, is where it gets the taste from. This process of cooking is also known as “Dum .
Cooking basmati rice nice and fluffy make your rice dishes look more beautiful. A little practice is all you need to cook this beautiful long grain rice. Here are a few tips for cooking basmati rice.
  • Wash rice two to three times under cold water to remove the starch.
  • soak rice for atleast 30mts in plenty of water. This allows the rice to expand and cook without breaking during cooking.
  • Add a tbsp of butter or oil to the boiling water while cooking rice. This would make the grains separate.
  • Make sure you cook the rice in a wide bottomed pan and do not disturb the rice by stirring in between. This would result in breakage of the rice.
  • Let the cooked rice rest for a while before serving it.
There are 3 basic steps for cooking a delicious hyderabadi chicken dum biryani.
  • Marinating the chicken
  • Half cook the basmati rice
  • Layering chicken and rice together for the biryani.
    • Note: Please adjust the marinade ingredients according to your spice levels.
    Now lets get into the things we need for these 3 steps.
    For the Marinade
    Chicken – 1 lb (about ½ kg) skinned, washed and cut into cubes. Boneless
    chicken can also be used but I prefer to use whole chicken with bones. Make sure you drain all the water after washing the chicken.
    Ginger & Garlic Paste - 2 tsps
    Mint leaves (pudina) – 10 sprigs finely chopped
    Coriander leaves – 10 sprigs finely chopped
    Saffron - 2 pinches soaked in ¼ cup of milk
    1 onion – finely sliced and deep fried till dark brown. (see pics)
    yoghurt – ¾ cup ( I used a measuring cup)
    chilli powder – 2 tbsp
    Turmeric powder – ¼ tsp
    garam masala – 2 tbsps (lightly roasted in a pan on low heat for 30 secs)
    juice of 1 big lemon (about 4 tbsps)
    Oil – ¼ cup
    Salt – ½ tsp
    Oil for deep frying the onions – ¼ cup (do not use left over oil in the marinade after frying onions. discard or save it for a different dish)
    For the rice
    Basmati rice – 2 cups ( I used a measuring cup). Wash under cold water and soak for 30 mts then drain the entire water in a strainer and set aside
    Whole green Cardamom – 4
    Cloves – 3
    Black cumin seeds (Shahi jeera) – ¾ tsp
    Bay leaves – 2
    Biryani flower ( Anasapuvvu) – 1
    Black pepper corns – 4
    Butter/oil/ghee – 1 tbsp
    Salt – 4 tbsps
    Water for boiling – 10 cups ( I used a measuring cup)
    A wide & deep sauce pan to cook rice
    For cooking in layers
    1 wide heavy bottomed deep vessel / pot
    A large dosa pan / flat bottomed skillet
    Pinch of red orange color dissolved in 2 tbsps milk or water (optional)
    Alluminium foil or a wet towel (squeeze the entire water) to cover the pan. Alternatively you can use whole wheat flour dough to seal the edges so that the steam does’nt escape.
    Now that you have all the ingredients ready. Lets take a peek at the recipe.
    - In a sauce pan heat about 1/4 cup of oil and deep fry onions as shown in the below pics till dark brown. Remove the onions and drain them on the kitchen towel. Once cool, crush them and set aside. They are ready to  be mixed in the marinade. Alternatively you can use store bought fried onions too. (Do not use left over oil in the marinade)

    The first step is marinating the chicken:
    In a large bowl, mix all the marinade ingredients till well combined. Cover and let it rest for an hour or overnight if you have some time. This would let the chicken absorb all the flavours of the spices and enhance the taste of your biryani.
    Cooking the basmati rice:
    While the chicken is marinating, place a deep sauce pan on the stove with 10 cups of water on high flame. When the water gets to boil, throw in the spices (cardamom, cloves, shahijeera, bay leaves, bay flower, pepper corns, butter, and salt) and cook for a minute. Now gently add in the drained rice to the boiling water and let it cook on high flame till another boil (takes 4 mts).
    Immediately drain the rice along with the spices in a strainer. Let all the water drain off. Set aside.
     
    OK, show time now, cooking both the chicken and rice together. But now that everything is ready, this is going to be a cake walk. Trust me. You can do this. Its EASY.
    Place a heavy wide bottomed deep pot or vessel on the stove top and turn it on high flame. Allow the pot to get hot for about a minute.
    Now arrange the entire marinated chicken at the bottom of this pot. This is your first layer.
    Then arrange the half cooked rice on top of the chicken. This is going to be your second and last layer.
    On top of the rice, add about 2 - 3 tbsps of oil. Cover the pot with a lid and cook on high heat for 3 to 4 mts. Do not cook more than that because your chicken might get burnt.
    Meanwhile heat a dosa pan/flat bottomed skillet on high heat till the pan is hot. Once hot reduce the flame to the lowest setting and place the chicken and rice pot on the tawa.
    Remove the lid and pour in the red orange color water around in the center. This would give your rice the restaurant style look with some of the rice grains looking orange in color. Who would’nt want to surprise their guests with such looks!!!

     
    Now seal the pot with an alluminium foil or a wet towel (squeeze all the water) or using the traditional whole wheat dough method. This allows the flavors of your chicken and rice to remain inside. Cook for 30 mts undisturbed on the tawa on the lowest setting. Switch of the flame and let it rest for 10 mts.
    Just before serving open the lid, gently mix in the chicken at the bottom with the rice. serve it hot with mirchi ka salan or raita and enjoy.

Carrot Halwa/Gajar Ka Halwa....step by step


Carrot Halwa or Gajar Ka Halwa is a simple carrot sweet dish. Carrots are simmered in milk and sugar till it is evaporated. My son loves this very much and yes I make this often for him. I usually grate it in my food processor and always use rich red color and juicy carrots which we get at this season.


I always add 3 or 4 green cardamons crushed and roasted (in ghee) cashewnuts and raisins.
The white spots you see on top is some silver balls I sprinkled before taking the picture :)

One thing I have noticed is that when you make the halwa with whole milk (full fat) you do not need to add extra ghee, but if you are using skimmed milk like I did for this post, then you need to add a little bit of ghee. But if you compare skimmed milk halwa and whole milk halwa....I'd choose the whole milk because you can see tiny weeny bits of khoya in the halwa and ghee from the whole milk itself makes it more juicy and tasty. I have included a picture of whole milk halwa at the end of this post.

Ingredients:
Fresh carrots: 1 kg, grated.
Sugar: 2 cups. (if you do not like too sweet then reduce by half cup, I am on the sweeter side).
Milk: 1 litre, if using whole milk no need to add ghee).
Ghee: 1 tbsp.(optional, only use if using skimmed milk)
Cahewnuts and rasins: 1 tbsp each. (optinal)
Crushed cardamon: 1 tsp.

Method:
1.Wash and scrap the carrots

2. Grate the carrots in a food processor or by hand held grater.
3. Put the carrots in a  large deep bottomed pan along with milk and sugar. Bring it to a boil and put the fire on medium (keep an eye on it coz the milk might boil over).

4. When the milk is almost evaporated...

5. Add the crushed cardamon. Fry the cahsewnuts and raisins in ghee and pour it in.

Again mix well for another 10 to 15 min or until the milk has evaporated completely. Allow it to cool. And served chilled or at room temp.


You can also serve with a dollop of vanilla ice cream but I like it to be served on its own.

Now about the full fat or whole milk halwa, like I mentioned earlier you need not add ghee or any dry fruits to it, though adding dry fruits is a personal choice, ofcourse cardamon gives that distinct flavor. Yesterday I made with whole milk and I took a close up pic to show the koya granules in the halwa. Though there is not a bit of ghee in the halwa, it is a bit chewy, glossy, and sticky as though I have poured tons of ghee (clarified butter) into it. Also I did not add any dry fruits...so you could call it a plain Jane!.

Halwa with low fat milk/ghee/dry fruits
                   

Halwa with whole milk minus ghee/dry fruits.        

Pick your choice and enjoy!!

Tuesday, June 26, 2012

How to Make a Cupcake Cone


Here’s a snappy idea which will lend a little whimsy to the next birthday party you throw for your child. Bake some cupcakes in ready-made ice cream cones. You can complete them ahead, and have the cupcakes ready for serving. Or you can bake and cool them in advance, leaving frosting and the decorating as an activity for that house full of energetic kids you're expecting.

Ingredients

• 2 cups all purpose flour
• 2 cups sugar
• 1/2 teaspoon baking powder
• 1 teaspoon salt
• 1 teaspoon baking soda
• 1/2 cup shortening
• 3/4 cup water
• 2 large eggs
• 3/4 cup milk
• 1 teaspoon vanilla
• 4 ounces melted unsweetened  baking chocolate


Steps

1
Make the batter for the cupcakes. Use a cake mix or your favorite scratch cake recipe. Prepare the batter as per directions.


Unwrap the ice cream cones slowly, being careful not to damage them as you remove any plastic coverings. Place each empty cone in a muffin tin, one per ungreased muffin cuffin cup


Pick up and fill each cone. Replace each cone in its muffin cup.


Leave a little room at the top for expansion (about 1/2 to 3/4 inch).

Do not overfill the ice cream cones with batter. An ice cream scoop holds about the right amount and lets you do a neat and trim job of filling. Aim for cupcakes which do not overflow the cones. These will be more attractive and will be easier to frost. The image of batter in the cone here will result in an unsightly overflow during baking:

This image shows what it looks like after baking overfilled cones; not very attractive.


Bake according to cake batter instructions. Bake for the same length of time you would bake regular cupcakes.

Prepare the icing or open up a store-bought icing mixture.


Place the sprinkles in a small bowl.

Remove the cupcakes from the oven and allow them to cool.


Frost the cupcakes using a knife or spatula. Try to let the frosting warm up a bit if you've been keeping it in the fridge, as some frostings are more difficult to work with when cold.

Dip the top of the cupcake in sprinkles. Dip fully or dip just one side for an artsy effect

Place each cupcake back into the muffin tin, or place in a serving dish with sides. Carry the muffin tin or serving dish very carefully; these cupcakes will be top heavy and have a tendency to topple.


Serve and enjoy!


Monday, June 25, 2012

How to Make Easy Homemade Biscuits


The following recipe makes hot, flaky American homemade biscuits using self rising flour. This recipe is very simple and doesn't take much time, and it freezes very well which means you can make a bunch at once and enjoy them whenever you like!

Ingredients

  • 2 cups (250g) self rising flour
  • 1 tablespoon sugar, optional
  • 1/3 cup (70g) shortening, such as Crisco
  • 3/4 cup (180 mL) milk, use between 2/3 to 3/4 cup milk (160 to 180 mL)
  • 1 tablespoon baking powder
  • 2 teaspoons of salt

Steps

  1. 1
    Preheat your oven to 425ºF (220ºC) .


    2
    Prepare a baking sheet by spraying it with non-stick spray.

    \3
    3 Create a floured surface for kneading the dough. A counter-top with wax paper is perfect; spread a liberal amount of flour over it.

    4Combine flour, baking powder, salt, and sugar (if you are using it) in a large bowl and whisk together well.


    1. 5
      Cut in your butter, shortening or margarine and continue mixing until the mixture looks like course bread crumbs. Do not over-mix! The flakiness you're looking for will elude you if you do.
      Slowly add the milk and stir it in until the mixture starts to come together into a dough ball.

      Place the dough ball on your floured surface. Let it rest. After about 5 minutes, knead dough gently about 10 times; flatten out the ball with your palms and fold it back in on itself.

      Roll out the dough about 1/2 to 3/4-inch thick using a roller, or your hands.

      Cut out biscuits using a 2-inch biscuit cutter. Dust the biscuit cutter in flour first for best results. Do not twist biscuit cutter when cutting out the biscuits; go down straight and come up straight. It's all right if they don't look perfect.

      Place the biscuits onto your prepared baking sheet. Pop them in the oven and bake them 10 to 15 minutes or until golden brown.

      Enjoy! Serve hot with butter, honey, jam, syrup or gravy.